How an IP Camera Placement Tool Streamlines Your CCTV Design
Why Placement Matters More Than Hardware
I have walked onto too many job sites where someone spent good money on high-resolution security cameras, only to mount them in spots that left blind corners or washed out faces in backlight. The camera itself is only half the equation. Where you put it, how you angle it, and what lens you choose decide whether that investment actually works. For years, the planning process meant sketching rough positions on a printed floor plan, guessing at fields of view, and hoping the installer could make sense of it. That approach wastes time and often leaves gaps in coverage. An IP camera placement tool changes that by letting you model the entire system before you pull a single cable.
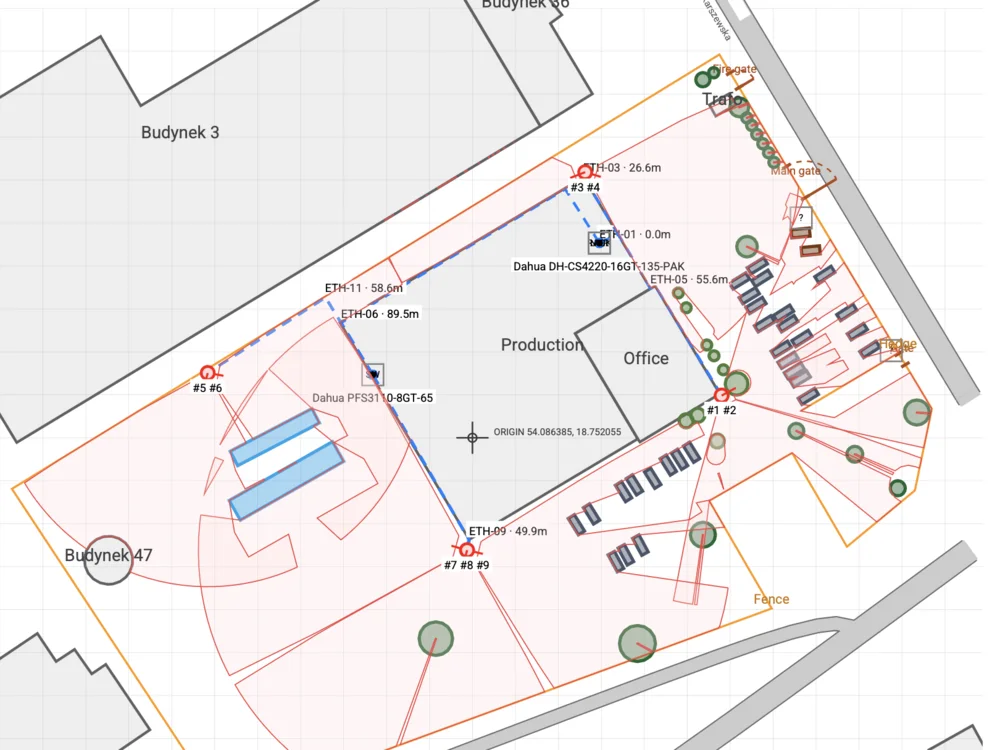
A good placement tool turns abstract numbers into visual reality. Instead of reading a spec sheet for a 2.8 mm lens and imagining what it will see, you drop a camera icon onto a digital map of the site and see the field of view drawn in real time. You can adjust the mounting height, tilt the camera down to cover a door, or swap to a longer focal length to read a license plate at the far end of the parking lot. The tool gives you immediate feedback on coverage, resolution at distance, and whether the scene will be usable for motion detection or license plate recognition. That kind of iteration is impossible with paper and a pencil.
What a Good IP Camera Placement Tool Should Do
Not all planning software is created equal. Some are glorified diagram editors that let you drop icons onto a drawing without any calculation behind them. A serious IP camera placement tool does the math. It knows the sensor size of the camera model, the lens you select, and the distance to the target. It then draws a realistic field of view on your floor plan or satellite image. You can see how many pixels per foot you will get at the far end of the coverage zone. That number matters for tasks like license plate recognition, where you typically need at least 130 pixels per foot to read a plate reliably at night.
The tool should also handle practical constraints. Can the camera see through that glass wall at night with infrared? Will the mounting bracket fit on the available wall space? Is there a PoE switch port within the 100-meter Ethernet limit? A good planner keeps these limits visible so you do not design a system that cannot be built. I have seen proposals that called for an IP camera on a distant pole with no way to run power or data, because the designer never checked the cable run distance. A placement tool that accounts for cable management and PoE budgets saves you that embarrassment.
Another essential feature is the ability to layer multiple cameras onto one coverage map. You need to see where overlapping fields of view cover the same area from different angles. That overlap is useful for redundancy and for reducing blind spots, but too much overlap wastes cameras. The tool should let you toggle individual camera views on and off so you can check for gaps. Some tools also let you simulate time of day or night vision conditions, which is critical for outdoor installations where lighting changes everything.
From Site Survey to Client Proposal in One Workflow
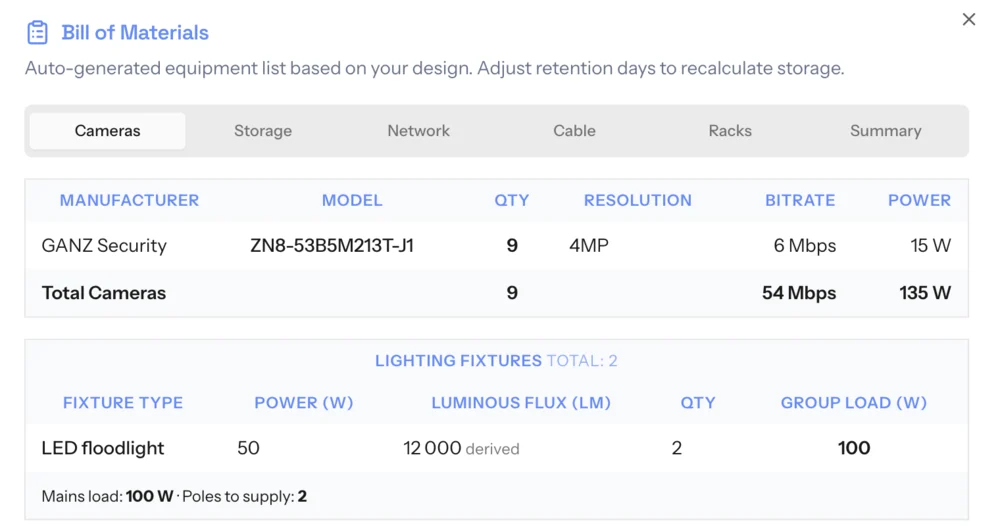
A professional CCTV design does not end with a coverage map. You need to communicate the plan to the client in a way they can understand. A client proposal that includes a clear technical drawing with labeled camera positions, lens choices, and coverage zones builds trust. It shows you have thought through the details. An IP camera placement tool that can export those drawings and a bill of materials saves hours of manual work. You generate the list of cameras, lenses, mounting brackets, NVR channels, and cable lengths directly from the plan. That list becomes the backbone of your quote and the purchase order for the installer.
I have used this workflow on a retail store layout that required twenty-four cameras covering sales floor, stockroom, and exterior entrances. The site survey took half a day. Back in the office, I loaded the floor plan into the placement tool, dropped in the cameras, and adjusted field of view until every register and every door was covered. The tool flagged one spot where the chosen 6 mm lens could not see the far corner of the loading dock at the resolution needed for license plate recognition. I swapped to an 8 mm lens and tilted the camera slightly, and the tool showed the coverage improved. That kind of adjustment on paper would have required a return visit to the site. With the tool, it took two minutes.
The same export gave me a technical drawing that the client could review and sign off on before any equipment was ordered. That sign-off prevented the all-too-common situation where the client sees the final installation and says, "I thought the camera would see the whole parking lot." A coverage map removes ambiguity. It is a visual contract between you and the client about what each camera will see.
Practical Tips for Using a Placement Tool
Here are a few things I have learned from using placement tools on real projects:
- Start with the site survey measurements. Do not guess at wall heights or distances. Accurate measurements make the tool useful. A laser distance meter is cheap insurance.
- Set your resolution target early. Decide whether you need facial recognition, license plate recognition, or just general activity monitoring. That choice drives lens selection and camera placement.
- Account for lighting. Night vision performance depends on the scene, not just the camera. If there is ambient light from streetlamps, you may need different lenses or camera placements than in total darkness.
- Use the tool to check for cable runs. Mark the location of your PoE switch or NVR on the map and measure the cable path to each camera. If any run exceeds 100 meters, you need a mid-span injector or a different camera location.
- Include deterrent signage in your plan. Mark where you will place signs that notify people the area is under surveillance. Some clients want this for legal reasons, and it belongs on the technical drawing.
Beyond the Basics: Advanced Features Worth Looking For
As you gain experience with an IP camera placement tool, you will start to appreciate advanced capabilities. Some tools let you simulate motion detection zones and estimate how many pixels a moving person will cover at different locations. That helps you set up alerts that actually work, avoiding false triggers from trees or cars. Others integrate with a product database so you can pull the exact specs for a given camera model, including sensor size, lens options, and night vision range. That accuracy matters when you are designing for a specific brand of IP camera.
Another feature I use often is the ability to generate a coverage heat map. A heat map shows the density of camera coverage across the site. Hot areas are covered by multiple cameras from different angles. Cold areas are potential blind spots. You can adjust camera placement until the heat map shows even coverage. This is especially useful for large open areas like warehouses or parking lots where a single camera cannot cover everything, and you need to balance lens selection and mounting locations.
Weatherproof housing and mounting brackets are details that often get overlooked in the planning phase. A placement tool that lets you note the bracket type and verify that the camera can be aimed correctly from that bracket saves headaches during installation. I once had a job where the specified wall mount did not give enough tilt range for the lens angle we needed. The tool caught it because the field of view preview showed the camera was pointing too high. We switched to an adjustable bracket before the order went in.
When the Tool Replaces the Second Site Visit
The biggest time savings come when you can skip a return trip to the site. After the initial site survey, you have enough data to build the plan in the placement tool. You can experiment with different camera models, lens options, and mounting heights without driving back out. You can share the coverage map with the client by email and get feedback. If they want a camera moved to cover a different door, you adjust it in the tool and send an updated drawing. That kind of remote collaboration used to require photo overlays and manual sketches. Now it happens in minutes.

A well-designed IP camera placement tool does not replace your judgment as a security professional. It amplifies it. You still decide where to place the cameras and what lens to choose. But the tool gives you instant visual feedback, catches mistakes before they become expensive change orders, and produces the documentation you need to close the sale and guide the installation. For anyone serious about designing effective CCTV systems, it is an essential part of the workflow.